ZenCrepes Serverless
note
This section refers to ZenCrepes as "Serverless", this is not entirely true. For GitHub authentication to be possible, GitHub requires a callback URL to be provided. This URL is used to redirect the authenticated user to the application after successful authentication, but obviously GitHub has no way to reach your browser directly in a client-side only setup. So a small service is hosted by the application to handle the authentication flow. But once authenticated, all of the API calls are made directly between the browser and GitHub.
How it works
ZenCrepes is client-side and stateless. The main concept around using ZenCrepes is not to introduce any dependencies to third-party services. Users have the option to operate directly with GitHub's UI or to use ZenCrepes. It also means that ZenCrepes cannot see any user data, once authenticated, all data exchanges are directly made between the user's browser and GitHub.
But this approach has two major drawbacks:
- ZenCrepes cannot register to GitHub hooks, therefore cannot be
informedabout updates. Instead, it needs to regularly pull for changes. - Since the database (Minimongo) is entirely client-side and bound to the browser's capabilities, the more data there is, the slower ZenCrepes is going to be. A few thousands of issues should be perfectly fine though.
Try-it!
Just go to https://zencrepes.io and log-in. It's all client-side, so not a chance we'll see your data.
What's Next?
(and a quick note from the Author)
In its current state, ZenCrepes is really more a proof-of-principle app than something with a proper design and correct implementation. Nevertheless, it does work, and already greatly simplifies agile management for my teams.
When starting ZenCrepes, the vision was to create an app sitting entirely on top of GitHub API, without needing any additional metadata stored elsewhere. The point was not to create a competitor to ZenHub or Waffle but to remove the need from using those. To give developers (and the team as a whole) the choice between updating their issues directly in GitHub or through an app (like ZenCrepes), both options achieving the same result.
Finally, ZenCrepes is OpenSource with the hope that getting people interested in the app will encourage contribution to its codebase. Getting a community of contributors to help build the necessary improvements, to hopefully get to an open platform built by team managers for team managers.
Overview
The section below will provide an overview of ZenCrepes main screens.
Wizard
When opening-up ZenCrepes for the first time, a short configuration wizard is presented, it provides general explanations and allows users to select repositories to load data from.

ZenCrepes can fetch repositories affiliated with the user, but it can also fetch data from public organizations and repositories, as long as they are configured to allow such action. Some that do are JetBrains, Microsoft (individual repositories, for example, cntk), elastic...
Use of Labels
ZenCrepes uses a set of specific labels (or specific label formats) for its reporting.
| Label Name | Label Description | Description |
|---|---|---|
| scope change | any | Use to track scope change |
| SP:x | any | Used to attach story points to an issue, x must be a number |
| any | SP:x | Used to attach story points to an issue, x must be a number. This is an alternative to the above, it allows the team to use t-shirt size for label names. |
| sprint:x | any | Used to identify issues part of a sprint, x can be a number or a string. |
| phase:x | any | Used to identify issues part of a phase, x can be a number or a string. |
| area:x | any | Used to identify issues part of different focus areas or different teams, x can be a number or a string. |
| activity | any | When attached to an issue, this issue becomes the authoritative source of content for a project. For example, issue assignees will be considered core participants to the project. When attached to a milestone, this milestone's dueOn date will become the delivery objective for the project. There can only be one activity issue per project |
Velocity
Velocity is an interesting metric, it gives a sense of a team's pace and potentiality to meet certain deadlines. But velocity metrics are not the single mean of estimating, it is one of the many elements available when planning and forecasting.
In most of its screens, ZenCrepes uses weekly velocity calculated on 4 weeks rolling average from the last data point. For example, the velocity of week 4 is the (W1+W2+W3+W4)/4 (yes it does include the current week).
ZenCrepes will also try to forecast how much time is needed to complete a set of open issues. The forecast will usually display 4 values:
- using average velocity over the entire project
- using average velocity over the past 12 weeks
- using average velocity over the past 8 weeks
- using average velocity over the past 4 weeks (default)
Variation in the displayed average also gives interesting indications whether the team has a steady pace, is accelerating or slowing down...
But again, understand what you are asking the metrics to provide.
Finally, when planning a new sprint, velocity is calculated as a sum of all of the individual contributors' past velocities across all past issues. As explained above, understand the implications of such a statement.
Staging changes
There are no backups of GitHub's content, so if you perform an action by mistake (like deleting a wrong Milestone), you are going to lose data. To make everything a bit safer, before pushing any changes, ZenCrepes does show you a list of all the changes, per repositories, that are about to be sent to GitHub's API.
During that stage, ZenCrepes is also going to query each of the individual elements to pull their latest version from GitHub, this prevents overwriting content by mistake if you operate with an outdated local cache. If an individual node updatedAt value is different between your local browser and GitHub, you will not be able to submit those changes. You will have to either remove this node from the list of changes or close the screen and perform the modification again. Again, all of this to prevent accidental modifications!
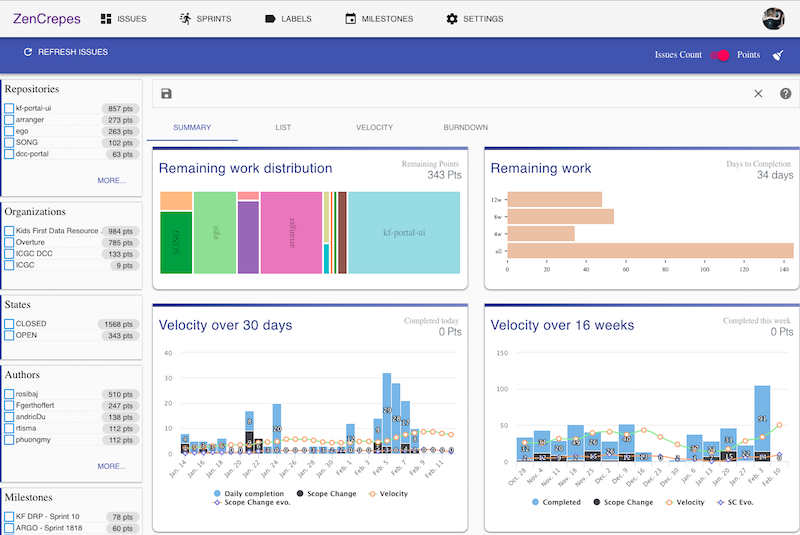
Issues Screen
The objective of the Issues view is to quickly filter down issues using faceted search and see metrics resulting from a particular set of issues.

Notice the switch Issues Count vs Story Points at the top of the screen. Story Points is the default, but the system will automatically fall back to Issues Count if no points were found. It's inaccurate but could still give relevant insights.
Sprints Screen
The objective of the Sprints view is to provide close-up insights into a particular sprint while supporting the team during scrum meetings. This view is only going to be relevant for teams using milestones to track sprints.

This screen contains the following:
- Completion status in terms of ticket counts and Points
- Breakdown of remaining points by an assignee
- Estimated Completion using various velocity metrics
- Markdown-style sprint notes
- Burndown chart for the current sprint
- Team velocity over the past 16 weeks
- List of issues
- Breakdown of issues count and points by assignees
- Breakdown of issues count and points by milestones
- Breakdown of issues count and points by labels
Since ZenCrepes cannot automatically be informed about changes in GitHub, an auto-refresh feature is available. Once enabled, it refreshes issues from all milestones (see the milestone table at the bottom of the screen) every 2 minutes, for 20 occurrences (so about 40mn total). Then the user has to re-activate auto-refresh.
Projects
The objective of the Projects view is to provide agile metrics for teams operating using GitHub projects. The view displays a list of projects with facets, metrics for individual projects can be obtained by clicking on the STATS button.
Labels Screen
The objective of the Labels view is to simplify management of labels across organizations and repository. Easily push a single label to 10s of repositories, easily apply a consistent color for one label across multiple repositories, ...

Modifications are bound to the query being applied, for example, if you select repo A & B, modifying or creating a label, will be bound to those 2 repositories only.
Milestones Screen
An almost identical approach than Labels but for GitHub milestones.

Settings Screen
The settings view allows users to select which repository to load data from. It shows the same screens than the configuration wizard.

Contribute
ZenCrepes is just at the beginning of its adventure, and contributions guidelines will evolve over time. For now, just submit a PR into its codebase. This PR will have to pass circle-ci tests (which is just linting and build).
If successful the PR will be merged into develop, from there it gets automatically deployed to a dev environment (https://dev.zencrepes.io) for further manual testing of the feature. If all is good, then a PR is created against master and merged. Master then get automatically deployed (https://zencrepes.io).
Develop ZenCrepes locally.
But first, you need to be able to run ZenCrepes in your local dev environment. The instructions below are going to be for Mac but should be very similar to other environments.
Fork and Clone ZenCrepes repository
In GitHub, create a fork of ZenCrepes' repository into your own profile.

Once done, clone the forked repository locally (replace the URL below with your fork).
Install dependencies
Once done, cd into the repo's directory and install the required dependencies.
And that should be it.
Register the app in GitHub.
Next, you need to register your app in GitHub to be able to log-in during your testing.
Open-up GitHub, and navigate to your settings.

Go to Developer Settings and click on New OAuth App.

Pick a name to your app and register it with the following URLs:

You will then be redirected to a screen containing your Client ID and Client Secret.
Modify settings.json
With your favorite editor, open the file settings.json at the root of the repository you just cloned.
Replace METEOR_GITHUB_CLIENTID and METEOR_GITHUB_CLIENTSECRET with the secrets you just obtained.
No need to modify GOOGLE_ANALYTICS, which is just used to provide usage metrics for zencrepes.io and dev.zencrepes.io.
Launch ZenCrepes
Back to your terminal, in the zencrepes directory, just launch meteor with the following command.
And that's it, you can now access your local instance of Zencrepes pointing your browser to http://localhost:3000 and start coding.
Deploy ZenCrepes to prod
If you contribute to ZenCrepes, you shouldn't have to worry about this aspect as ZenCrepes was set up to autodeploy to zencrepes.io and dev.zencrepes.io, but if you ever want to deploy your own instance online, you'll find some brief instructions below.
Configuration
It is possible to indicate which top-level menus should be made available to the running app by updating the menu key in settings.json. If the object is empty {}, all menus are shown.
This is useful to make different menus available depending of the environment.
Deployment
The best source of instructions for deploy is actually the .circleci config available here: https://github.com/Fgerthoffert/zencrepes/blob/master/.circleci/config.yml